Setting up WireGuard VPN on UniFi Dream Machine Pro (UDM Pro)
Having access to my home network from anywhere is the key to have my arsenal on demand. Be it for a quick look in a text file on my pc, or to remotely troubleshoot my devices, I should be able to access them when the time comes. But accessibility comes with a significant risk of security. No one should ever expose their private network without any layer of security. I have seen most successful attack originating from the internet is due to low security or no security at all.
It is advisable to have some layer of security to mitigate the risk and implement a layer 2 VPN for the connection. I have used OpenVPN previously but WireGuard is all the buzz now. My setup is very simple, which I will be setting up my UDM Pro as the WireGuard server and my phones as the clients.
Before you proceed, you must have a good understanding of networking to be able to understand how and why the configuration is done as is. This diagram visualizes what my setup is.
Installing WireGuard Kernel Mode for UDM Pro
Open an SSH connection to your UDM Pro, and download the latest wireguard-kmod. Please check the link below if you do not know how to enable SSH on the UDM Pro
UniFi – UDM: How to Login to the Dream Machine using SSH
You can download the files from here https://github.com/tusc/wireguard-kmod/releases
# curl -LJo wireguard-kmod.tar.Z https://github.com/tusc/wireguard-kmod/releases/download/v5-28-21/wireguard-kmod-05-28-21.tar.ZWhen the download completes, run this to extract the contents to /mnt/data
# tar -C /mnt/data -xvzf wireguard-kmod.tar.Zcd into /mnt/data/wireguard and run the script setup_wireguard.sh once the extraction is complete.
# ./setup_wireguard.sh
loading wireguard...
This will basically will symlink to the wg binaries and /etc/wireguard and load the kernel modules. You should see something like this in dmesg.
wireguard: WireGuard 1.0.20210219 loaded. See www.wireguard.com for information.
wireguard: Copyright (C) 2015-2019 Jason A. Donenfeld <Jason@zx2c4.com>. All Rights Reserved.
To be able to make it persistent across reboot, you have to run the script on boot. You need to do this in the UniFi OS directly running the below command.
# unifi-os shellDownload udm-boot_1.0.5_all.deb, install it and exit.
# curl -L https://udm-boot.boostchicken.dev -o udm-boot_1.0.5_all.deb
# dpkg -i udm-boot_1.0.5_all.deb
# exit
Back on the UDM Pro, copy the WireGuard boot script into the /mnt/data/on_boot.d/ folder. This will run on every boot, and bring up wg0 interface.
# curl -LJo /mnt/data/on_boot.d/10-wireguard.sh https://github.com/k-a-s-c-h/unifi/blob/main/on_boot.d/10-wireguard.shFor more info, please refer here. UDM Pro on-boot-script
Configuration
Configuration is quite easy compared to other setups. There is a sample file provided, and you can use that as a start.
# cp /etc/wireguard/wg0.conf.sample /etc/wireguard/wg0.conf
# vi /etc/wireguard/wg0.conf
You will need to generate the key using included wg bin.
Generate the keypair for UDM Pro first
# wg genkey | tee udmprivatekey | wg pubkey > udmpublickeyAnd generate the keypair for my phone
# wg genkey | tee phoneprivatekey | wg pubkey > phonepublickeyThe contents of the files are the key for both configurations.
As I mentioned earlier, my setup only for my phone to access my home network. My wg0.conf on UDM Pro looks like this.
[Interface]
Address = 172.16.20.1 #the LAN interface IP on UDM Pro
PrivateKey = udmprivatekey #contents of udmprivatekey
ListenPort = 44333 #port to listen for connection

[Peer]
PublicKey = phonepublickey #contents of phonepublickey
AllowedIPs = 172.16.20.0/24 #my local network subnet

# This is for if you're behind a NAT and
# want the connection to be kept alive.
PersistentKeepalive = 25
That’s the basic config needed for the server part (UDM Pro).
Some of you may find this is hard, so you would better off using this config generator
https://www.wireguardconfig.com/
Generate and overwrite wg0.conf
Starting the tunnel
Run this in the terminal
# wg-quick up wg0and it should show up something like this
[#] ip link add wg0 type wireguard
[#] wg setconf wg0 /dev/fd/63
[#] ip -4 address add 172.16.20.1/24 dev wg0
[#] ip link set mtu 1420 up dev wg0
You can also check the status using wg
# wg
interface: wg0
public key: XXXXXXXXXXXXXXXXXXXXXXXXXXXXX
private key: (hidden)
listening port: 44333

peer: XXXXXXXXXXXXXXXXXXXXXXXXXXXXXX
endpoint: 10.243.45.111:44334
allowed ips: 10.10.10.2/32
latest handshake: 2 seconds ago
transfer: 11.65 MiB received, 151.40 MiB sent
persistent keepalive: every 25 seconds
Stop tunnel
To stop the tunnel, run
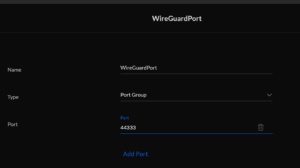
# wg-quick down wg0Before you start connecting, you need to allow incoming wireguard packet through the configured listen port, which in my case is 44333, you can change it to suit your environment.
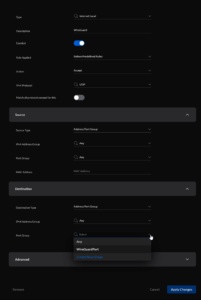
Depending on your UDM Pro UI, you need to configure a firewall rule on you WAN LOCAL. Please refer here how to get there.
UniFi-UDM-USG-Introduction-to-Firewall-Rules
Configure it like this. You need to add a new port group.
Configuring peer devices
For easy config on the phone, you can generate a qr code and scan it by running this
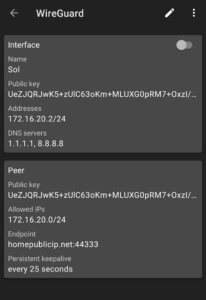
qrencode -t ansiutf8 </etc/wireguard/wg0.confOn the phone, install WireGuard app and scan the barcode.
It will look like something like this.
Well, that’s it. You now have a running a secure tunnel to your home network.
Additional options
Multi WAN failover
If you have multiple WAN uplink, you can use this script to failover to which WAN connection is available.
This goes into /mnt/data/on_boot.d folder.
Related links
UniFi Dream Machine Pro : https://store.ui.com/collections/unifi-network-unifi-os-consoles/products/udm-pro
WireGuard : https://www.wireguard.com/
WireGuard-kmod : https://github.com/tusc/wireguard-kmod
UDM/UDM Pro Boot Script : https://github.com/boostchicken/udm-utilities/tree/master/on-boot-script#readme
UDM Source Code : https://github.com/tusc/UDM-source-code
WireGuard Docs : https://github.com/pirate/wireguard-docs#WireGuard-Setup-tools


 by yusri


